Cleaning a Glock and Glock Cleaning Tips. Glock handguns account for over 60 percent of the world handgun market and there is a reason for this. They work and they are easy to maintain! I call it elegant simplicity, Glocks are not nice looking guns, but Glocks are elegant in their simplicity of design. Part of the reason that Glock pistols are so reliable is that they are designed to require minimal cleaning and lubrication. More oil and grease means more area for dirt and debris to stick. Metal to metal moving parts require some lubrication so Glocks are lubed just where they need it and no more. Dirt, debris, and residue does not accumulate so readily because they are relatively dry, and that is part of the reason the Glock is one of the most reliable pistols you can own. To be honest most all guns should be lubed just where they need it. Over lubrication does more harm than good, unless you are using an AR15.
Glock maintenance usually consists of just routine cleaning. All Glocks are similar in construction, therefore these Glock cleaning instructions apply to all the Glock models.
First, Safety Check the Weapon.
- Remove the magazine,
- Cycle the slide to examine the chamber
- Check for rounds to make sure the pistol is not loaded
- Do not get careless, Do not rush, Be safe.

Glock Disassembly is easy –
- Point pistol in a safe direction
- Pull the trigger
- Move the slide rearward just about a quarter of an inch.
- NOTE: If the slide is moved too far the trigger will reset. If this happens then pull the trigger and try again.
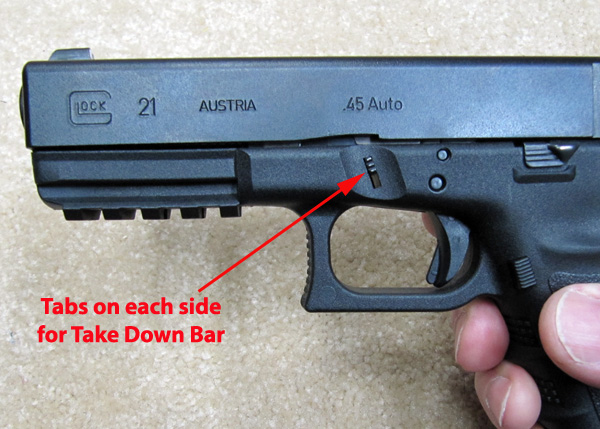
- Depress the take down bars to release the slide assembly.
- Remove the slide from the frame.
- The slide may feel as though it is stuck. This is normal.
- Depress and hold the trigger, the slide will come right off.
- Remove the recoil spring assembly.
- Remove the barrel.
The Glock is now ready for cleaning.
Here is an animation depicting the take down of a Glock pistol;
Glocks are easy to clean –
Run a wet solvent soaked patch through the barrel bore and set it aside to soak.
Brush the recoil spring assembly with a clean dry brush then wipe the assembly with a lint free cloth or paper towel.
Wipe the frame rails with a solvent dampened cloth or lint free shop towel. Brush dirt and debris from the inside of the frame with a dry brush.
Wipe the entire frame with a clean solvent dampened cloth or lint free shop towel.
Barrel bore cleaning
Wet a bronze bore brush with bore cleaning solvent.
Push the wet brush all the way through the bore.
Always enter the barrel from the breach.
Never enter the barrel from the muzzle end.
Run the brush all the way through the barrel then pull it back.
Do not change direction with the brush still in the bore, run the brush all the way through and then pull it back through. Do this several times.
Using a proper size jag run a solvent soaked patch through the bore.
Run several dry patches through the bore until clean.
If the gun will be stored for any length of time then run an oil soaked patch through the barrel.
If the barrel is oily, Run a dry patch through the barrel just before shooting. Do not shoot with an oily barrel. Doing so can cause damage to the bore.
Glocks are easy to lubricate –
Using good quality gun oil
Lube the outside of the barrel where it goes through the slide with a drop of oil then wipe it around with finger
Lube the flat breach top of the barrel where it contacts the slide with a drop of oil and smear it around with finger
Lube the notch of the barrel where it contacts the take down bar with just a drop.
Lubricate each slide rail with a small drop of oil and smear it with finger to coat the entire rail surface.
How much lubricant is enough? Some gun owners use a lite coating of grease on the rails. Oil or grease will work just fine just don’t over lubricate because the lube attracts dirt and debris.
NOTE: New Glocks come from the factory with a copper colored grease on the slide rails. Sometimes this is a slight amount and sometimes it is a little sloppy. Leave that grease on the rails and don’t remove it until you shoot a lot of rounds through your Glock. I leave mine in place for 500 rounds or more but there is no strict rule.
Place a very small drop of oil on the connector where it contacts the trigger bar.
Glocks are easy to reassemble –
Install the barrel into the slide.
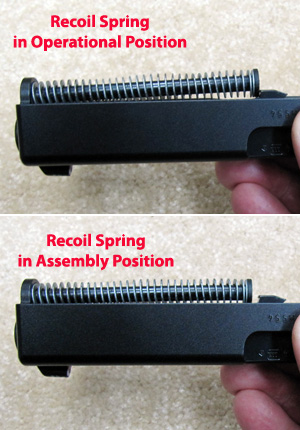
Install the recoil spring assembly.

NOTE: The recoil spring assembly has a position for reassembly and then has a position operation.
Make sure the recoil spring is pushed into the lower curved seat location on the barrel. This is the reassembly position.
After the gun is assembled and cycled one time, the recoil spring jumps up into the position for operation. If you don’t install the recoil spring correctly in the reassembly position, you can chip the recoil spring rod. The gun will still work but the rod is chipped and unsightly and indicates that you didn’t reassemble your Glock properly.
Position the slide on the frame rails and install the slide assembly.
Point the gun in a safe direction.
Cycle the slide several times and pull the trigger to test operation.
Watch a Glock Cleaning Video on YouTube. There are dozens and dozens of them. Some are BS. The one that I recommend is by Hickock45. He is an experienced gun enthusiast who is partial to the Glock.
Hickock45 goes over the basics of cleaning your Glock. His methods are simple, quick, andproven over many years of glock experience.
Glock Models –
- Cleaning a Glock 17
- Cleaning a Glock 19
- Cleaning a Glock 26
- Cleaning a Glock 21
- Cleaning a Glock 30
- Cleaning a Glock 36
- Cleaning a Glock 22
- Cleaning a Glock 23
- Cleaning a Glock 27
These cleaning tips apply to all Glock models.
